**Our resident grid Guru, Lee, has written this great tutorial on how to set up a Baseline Grid in inDesign:**
Good, clean typography is a fundamental skill of any designer and is a skill that, in my experience, is developed through time and experience. Most creatives begin their design careers with a desire to be outrageously creative, but with time you realise that simplicity and structure is just as important, if not more so.
In this article I hope to guide you through some simple steps to achieve good, clean and well structured typography, at a basic level, in inDesign.
The first step is to choose your typeface. For this tutorial I have chosen the much loved Helvetica Neue at 9pt and 12.027pt (4.243mm) leading, you could always go to ‘Designers Bookshop’ and download the ‘Grid Calculator’ which will give you a more precise calculation with the paper size you are using – remarkable and time saving grid tool which I highly recommend, unless you enjoy the math!
(image: https://www.superdream.com/content/5-news-blog/20120515-tutorial-setting-up-a-baseline-grid-in-indesign/13.jpg alt: 1)
(image: https://www.superdream.com/content/5-news-blog/20120515-tutorial-setting-up-a-baseline-grid-in-indesign/2.jpg alt: 2)
At this point, it is important to consider legibility. Try not to go below 7pt body copy for magazines, brochures or any other type of printed materials. 6pt type is border line on most glossy publications, but be aware of ink bleed!
(image: https://www.superdream.com/content/5-news-blog/20120515-tutorial-setting-up-a-baseline-grid-in-indesign/3.jpg alt: Step 3)
(image: https://www.superdream.com/content/5-news-blog/20120515-tutorial-setting-up-a-baseline-grid-in-indesign/4.jpg alt: Step 4)
Next we set up the margins and columns. Select the A-Master in the Pages panel and open the Margins and Columns panel, found under the Layout menu. Enter the number of columns you want to use, making sure you consider aesthetics and legibility. Columns are extremely important, as they give the page more structure and make a printed document easier to read. Research has shown 8-10 words per line is the most legible so for this tutorial I have reflected this by using a 3 column layout with a 3.5mm gutter.
(image: https://www.superdream.com/content/5-news-blog/20120515-tutorial-setting-up-a-baseline-grid-in-indesign/5.jpg alt: Step 5)
For the margins, it’s common practice to have the border dimensions at least double your gutter width. I’ve chosen to add more to the inside to allow for loss of text in the gutter width due to binding with more at the bottom to allow for page folios.
(image: https://www.superdream.com/content/5-news-blog/20120515-tutorial-setting-up-a-baseline-grid-in-indesign/6.jpg alt: Step 6)
(image: https://www.superdream.com/content/5-news-blog/20120515-tutorial-setting-up-a-baseline-grid-in-indesign/7.jpg alt: Step 7)
Now we will set up a baseline grid. In the inDesign menu, select Preferences>Grids. Start the grid at 12mm in accordance with your borders. Type into the Increment Every, 12.027pt (4.243mm) in accordance with your type leading. Ignore the Document Grid in this instance, thats something to look forward to in other tutorial.
Press OK.
(image: https://www.superdream.com/content/5-news-blog/20120515-tutorial-setting-up-a-baseline-grid-in-indesign/8.jpg alt: Step 8)
(image: https://www.superdream.com/content/5-news-blog/20120515-tutorial-setting-up-a-baseline-grid-in-indesign/9.jpg alt: Step 9)
Your grid is now set up, to make the grid visible, go to the top bar menu again, View>Grids and Guides>Show baseline Grid. Your guides are now visible and are running across the page horizontally, at the same leading as your type.
(image: https://www.superdream.com/content/5-news-blog/20120515-tutorial-setting-up-a-baseline-grid-in-indesign/10.jpg alt: Step 10)
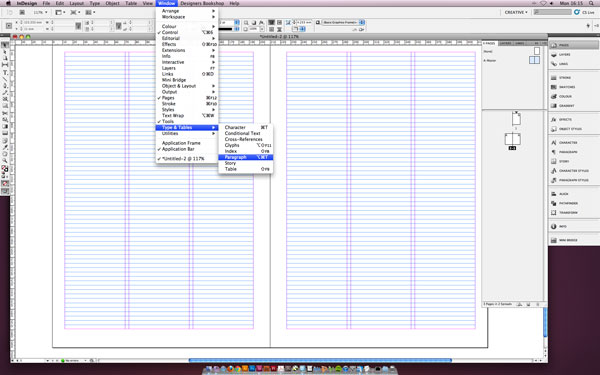
Now we make the type stick to your baseline grid. Open the paragraph display box, Window>Type and Tables>Paragraph and select align to baseline grid in the bottom right hand corner. All type lines should now stick perfectly to your baselines.
Remember, it’s extremely useful and time saving to set up character and paragraph styles. It can also prevent any mistakes in font weights and so on appearing when they’re used properly.
(image: https://www.superdream.com/content/5-news-blog/20120515-tutorial-setting-up-a-baseline-grid-in-indesign/111.jpg alt: Step 11)
Next you want to add a heading. To get it to line up nicely with the body copy, make the leading of the heading multiples of your baseline grid’s 12.027pt. This way you can lock it to the baseline grid and it will automatically line up with the flowing copy. I’ve chosen to have my heading 60.135pt, six times the baseline’s 12.027pt leading.
This way each line can naturally line up with a line of the body text. The title size also allows it to sit nicely and not overlap at all. If the tops of letters such as h is hitting a lower curve of a g it can reduce legibility and also make it ugly. Don’t forget to click the Align to baseline grid button on the paragraph formating box again.
(image: https://www.superdream.com/content/5-news-blog/20120515-tutorial-setting-up-a-baseline-grid-in-indesign/121.jpg alt: Step 12)
We shall now add an introduction paragraph in the exact same way. This time I will select 24.054pt leading, again a multiple of our 12.027pt grid. Remember to click the Align to baseline grid button. When choosing this size, always think about the hierarchy of text in a layout, making sure the eye is drawn to the heading first, then the strap line and finally the body.
Finally, add your body copy.
(image: https://www.superdream.com/content/5-news-blog/20120515-tutorial-setting-up-a-baseline-grid-in-indesign/131.jpg alt: step 13)
Now, if you choose, you can go back and look at the tracking of the body copy and the kerning of the headers. It’s always good practice to manually kern larger type, especially for the headers.
Hopefully, everything is aligning perfectly giving the page a neat structured look and feel. Remember to look out for rivers and orphans!